Beginner · Original Beadify design
Little Radish Perler Bead Pattern
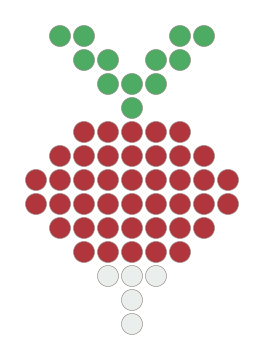
A round red radish with two green leaves and a short white root tip. Follow the stepped sides and keep the spaces between the leaves empty.
- Beads
- 59
- Colors
- 3
- Motif size
- 9 × 13 pegs
- Pegboard
- 1 square 29 × 29
No sign-in needed for this PDF. Editing creates a copy in this browser; editor exports use your plan’s normal limits.
Beads and supplies
Use Perler Midi 5 mm beads, one square 29 × 29 pegboard, bead ironing paper and an iron handled by an adult.
| Label | Perler color | Beads |
|---|---|---|
| 2 | Red80-19005 | 42 |
| 1 | Bright Green80-19080 | 12 |
| 3 | White80-19001 | 5 |
| Total occupied pegs | 59 | |
Color swatches are approximate. Match the product IDs; blank background cells do not use beads.
How to build it
Making your first fuse bead design? The beginner pattern guide walks through reading a chart and placing each row.
- Print the PDF at 100% (Actual Size) with Fit to Page turned off. Check its 50 mm ruler before using the 5 mm grid.
- Place the two green leaves first and join them at the stem. Build the red shoulders under the stem, widen the middle rows, then narrow the lower rows into the white root. Check the green stem touches the red body and leave all surrounding pegs empty.
- Check the color totals and outline before ironing. Every numbered cell takes one bead; leave blank cells empty.
- Have an adult fuse the beads using ironing paper and the bead manufacturer’s instructions. Let the design cool before lifting it.
Read the fuse bead ironing guide
You can swap colors in the editor. That changes your own copy; the downloaded original PDF stays the same. To start with your own photo or drawing, use the Perler bead pattern maker.
More patterns to try
Each fits one 29 × 29 pegboard and includes a free printable PDF.