
Use the Editor
Choose Pattern, Compare, or Crafting, then set up, edit, inspect, and export a bead pattern
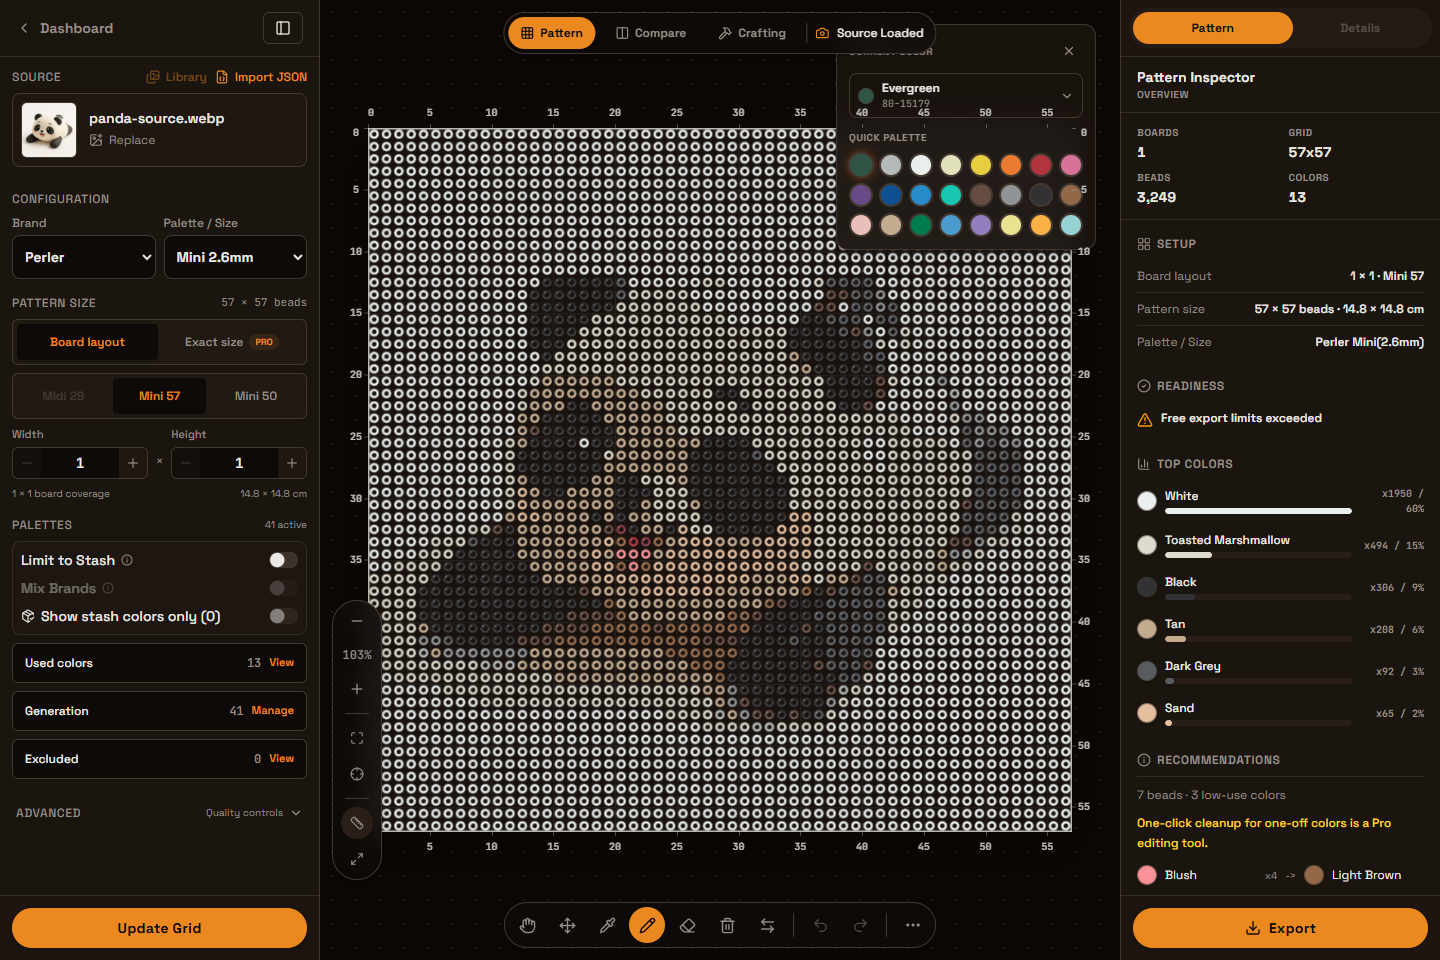
The Editor follows one maker workflow: open a Project, choose a mode, prepare the Pattern, edit or track it, then export or continue later. Desktop keeps the setup, canvas, and Inspector visible together; smaller screens reflow the same actions without changing what each mode does.
1. Open A Project
Choose the entry that matches the mode you want:
- Pattern maker opens the editable Pattern.
- Image to bead pattern opens Compare.
- How to use a bead pattern opens Crafting.
You can also open a saved Project from Dashboard > All Patterns, or choose Open in Editor on a Showcase detail page. These entries keep the Project's saved grid, palette, board, and mode target.
Inside the Editor, the Source row offers three ways to continue:
- Upload / Replace chooses a local source image.
- Library chooses a signed-in Image Asset.
- Import JSON restores a Beadify backup as a local Project.
Changing the source clears the generated Pattern and keeps the new image ready for regeneration. Review the settings, then click Update Grid.
2. Choose A Workspace Mode
The switch above the canvas moves between Pattern, Compare, and Crafting. It does not create another Project.
Pattern
Pattern is the only editable mode. Use Pencil, Eraser, Pick Color, Delete Color, Swap Colors, Move, Flip, and Clean to change the applied bead grid. Undo and Reset Changes also operate on this editable Pattern state.
Compare
Compare needs a source image. Use Split to see the adjusted source and draft Pattern side by side, or Overlay to stack them. Source and Pattern opacity controls make it easier to inspect edges, missing areas, and color placement.
Compare shows a draft, not a second saved Pattern. Apply it with Update Pattern before editing or exporting. Until then, Pattern editing and export actions stay unavailable so a download cannot silently differ from the canvas.
Crafting
Crafting requires a Project with a generated Pattern. The grid stays read-only while you mark physical beads as placed:
- Click one bead or drag across a run.
- Use the arrow keys to move, then press Space or Enter to toggle a bead.
- Follow the placed count and completion percentage while you build.
Progress is saved for this Project in the same browser. When the Pattern changes, marks that no longer match are cleared. Reset asks for confirmation and removes only the local placed-bead marks; it does not change the Pattern, undo history, current cloud Project, Showcase item, or exported files.
3. Set Up The Pattern
Configuration And Pattern Size
Use Configuration to choose the bead brand and palette. Board choices follow the selected bead size; unavailable board types remain visible but disabled so you can see why they cannot be selected.
New Projects start with Perler Mini 2.6 mm and one 57 x 57 board. In Board layout, select a board type and use the width and height steppers to choose how many physical boards the Pattern should occupy. Beadify preserves the source ratio and leaves unmatched cells blank instead of stretching the image.
Pro members can switch to Exact size, which starts at 32 x 32. Exact size hides the board type and keeps the requested grid without adding board seams. The Inspector shows how that grid covers complete or partial physical boards.
After a plan ends, an existing exact-size Project remains viewable and manually editable. Pro is required to change its Exact frame, regenerate it, import another exact-size backup, submit it to Showcase, or export it.
Palettes And Advanced Controls
The left Palettes section summarizes three color sets:
- Used colors are already present in the applied Pattern.
- Generation colors are available for the next Update Grid run after palette, stash, mix, and exclusion rules.
- Excluded colors are blocked from future generation and cannot become a brush color until you allow them again.
Open a row to manage its full color list in the right Details tab. Advanced contains sampling, cleanup, dithering, and image adjustments. Image adjustments also open in Details so you can compare the adjusted source with the draft before applying it.
4. Edit The Applied Pattern
Draw, Erase, And Pick A Color
Use Pencil and Eraser for individual beads. Pick Color samples a bead from the canvas and makes it the current Pencil color. When Pencil is active, the Quick Palette shows that color; select it to reopen Add Color.
Delete Or Swap Used Colors
To remove one color everywhere:
- Select Delete Color.
- Choose the color on the canvas or in Used Colors.
- Confirm the swatch and bead count, then select Delete.
Delete Color does not open a second browser confirmation. Use Undo if you selected the wrong color.
To exchange two colors, select Swap Colors, choose the first and second used colors, check both swatches, then select Swap. After either temporary color action, Beadify returns to the tool you were using before it.
Move, Flip, Clean, Or Reset
- Move repositions the design inside the existing grid.
- Flip Horizontal mirrors it from left to right.
- Denoise / Clean removes isolated beads and makes color areas easier to assemble.
- Reset Changes restores the state loaded when the Project opened, or the most recently generated Pattern. It does not restart from the source image.
5. Inspect The Pattern And Canvas
The right Pattern tab summarizes:
- board layout, grid size, physical size, and palette;
- export readiness, excluded colors, and high color-count warnings;
- the most-used colors and their share of the Pattern;
- the count, share, brand, and palette for a selected used color.
When many colors appear only once or a few times, the Inspector can recommend cleanup. Clean up colors is a Pro editing action. Free users can review the recommendation; selecting the locked action opens the upgrade prompt without changing the Pattern.
Use Fit, Center, Guides, and Maximize to inspect the canvas. Guides controls edge numbers and board division lines. At smaller zoom levels, edge numbers become less frequent to stay readable. These controls never change bead data or export output.
6. Apply, Export, And Continue
If Compare or Details contains a draft, select Update Pattern first. Then open Export for PDF Pack, Image Export, SVG, XLSX, or JSON Backup. See Export Options for format, allowance, quality, branding, and print settings.
Use Crafting after the Pattern is final enough to assemble. Guests resume Crafting progress in the same browser. For signed-in makers, Cloud Sync keeps the current Project and its separate Crafting checklist together: Free users choose Sync now, while Pro and lifetime users receive automatic sync.