Beginner · Original Beadify design
Little Mitten Perler Bead Pattern
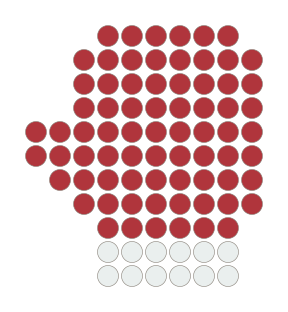
A small red mitten with a stepped thumb and a white cuff. Two colors separate the rounded fingers from two straight cuff rows.
- Beads
- 85
- Colors
- 2
- Motif size
- 10 × 11 pegs
- Pegboard
- 1 square 29 × 29
No sign-in needed for this PDF. Editing creates a copy in this browser; editor exports use your plan’s normal limits.
Beads and supplies
Use Perler Midi 5 mm beads, one square 29 × 29 pegboard, bead ironing paper and an iron handled by an adult.
| Label | Perler color | Beads |
|---|---|---|
| 1 | Red80-19005 | 73 |
| 2 | White80-19001 | 12 |
| Total occupied pegs | 85 | |
Color swatches are approximate. Match the product IDs; blank background cells do not use beads.
How to build it
Making your first fuse bead design? The beginner pattern guide walks through reading a chart and placing each row.
- Print the PDF at 100% (Actual Size) with Fit to Page turned off. Check its 50 mm ruler before using the 5 mm grid.
- Start with six red beads across the top, then place three rows of eight red beads. Extend the next two rows left to ten beads to form the thumb. Shorten the following rows to nine, eight and six red beads. Finish with two rows of six white beads directly below the narrow red base. Leave the dots empty and check that each step shares an edge.
- Check the color totals and outline before ironing. Every numbered cell takes one bead; leave blank cells empty.
- Have an adult fuse the beads using ironing paper and the bead manufacturer’s instructions. Let the design cool before lifting it.
Read the fuse bead ironing guide
Use the Pattern editing guide to change colors or individual beads in your copy. After editing, check Info again for the applied color counts. The original PDF stays unchanged. To start with your own photo or drawing, use the Perler bead pattern maker.
More patterns to try
Each fits one 29 × 29 pegboard and includes a free printable PDF.